VitalZ-X User Guide
Author – Shreya Dubey
Chart Techno Solutions Private Limited
About us
- CHART Techno Solutions Private Limited is a company incorporated in the city of Hyderabad, India.
- CHART primarily focuses on Predictive and Deductive Data Analytics, Innovative Healthcare Oriented Solutions, Design and Development of Mobile Platforms and Developing Inventive Healthcare Technologies.
CHART has developed a comprehensive healthcare technology platform for Home and Onsite Healthcare to provide:
- Instant (Chronic Disease) Risk Analysis of Individuals across multiple therapeutic areas
- Online Deductive Analysis of Individuals on effect of Stress and other frequently occurring conditions such Compulsive Obsessive Disorder, Mania etc. that affects Productivity and Causes/Impacts Chronic Diseases
- Uniform Protocol and Process Oriented data acquisition Tool for Home and Assisted Living Healthcare Organizations
- Remote Monitoring of Rural Population and Elderly Citizen Living in Assisted Living Centers
- Automation and instant communications (Alerts and Actions) to and from Medical professionals to ICUs and nurses
- Reduction of Total Cost of Healthcare for the Individuals
- To achieve the above, CHART has developed a Cloud based SaaS (Software as a Service) Platform which includes a Web as well as Mobile Application called HealthE. HealthE allow Stakeholders to monitor the Prognosis, Diagnosis at real time and perform Management of different types of Patients, as well.
- CHART has also developed a diagnostic device VitalZ-X using IoT infrastructure. VitalZ-X is portable, it can perform Multiple Diagnosis at the patient location and instantly deliver the result with minimal manual input. This allows immediate online Risk Analysis along with Reports & Alerts. Using this tool patients can be Monitored as well as Managed remotely.
VitalZ-X, which essentially is a collection of diagnostic and in-vitro POC tools, that are:
- Individually CE or CE and FDA approved
- Every one of the tools used, has undergone clinical trials and the reports are available with us
- CHART has not materially altered any of the tools in any shape or manner
- CHART team has used its mechanical, electrical, electronic and software knowledge to connect these tools to a processor to capture the results of the diagnosis produced
- CHART doesn’t materially alter the data captured
- CHART team using its own expertise transmits the data captured to the mobile app HealthE
- As per its product development strategy, CHART intends to keep on making multiple additions to existing version to make diagnosis easier and more accessible.
- CHART wants to build an Electronic Healthcare Database, in order to develop quantitative models from real world longitudinal patient data to understand the drug effectiveness and mechanistic disease progression.
Objective
The document contains the IT Protocols for performing Diagnosis using VitalZ-X. The purpose of this document includes but not limited to training of the Avekxa Healthcare Managers, Avekxa Nurses and other personnel involved in executing Healthcare and Nursing work. All content included in this document is owned and is considered as intellectual property solely belonging to CHART Techno Solution Pvt. Limited.
Review
This document shall be reviewed once a year or at any other time when ever any change in the law of the land that has impact upon the content of this document, or any situation arises that necessitates changes in this document.
Content
Introduction
VitalZ-X is an integrated tool of DCGI, USFDA, CLIA waived and CE approved point of care and in vitro diagnostic instruments. VitalZ-X can generate over 200 diagnostic parameters for a person within 15-20minutes by using only 5 drops of blood and 5 drops of urine. VitalZ-X is built using the latest technologies and it is used to perform healthcare screening and diagnosis.
CHART has developed a Cloud based SaaS (Software as a Service) Platform which includes a Web as well as
Mobile Application called HealthE. HealthE allow Stakeholders to monitor the Screening, Prognosis, Diagnosis at real time and perform Management of different types of Patients. HealthE is preinstalled on a tablet provided by CHART as a part of whole package. It communicates wirelessly with VitalZ-X. HealthE is used for patient management, diagnosis device, data collection and reporting device.
HealthE is a mobile and web-based platform that has been developed as an ERP for several utilities and for various stakeholders. It has multiple components, and several add-on facilities for every user. HealthE is installed on AWS cloud and uses a Block-Chain architecture-based Oracle database to store data, that makes the system automatically optimized for performance. It is built using HIPAA (The Health Insurance Portability and Accountability Act) compliance and keeps audit trails of all records as per US FDA guidelines. The data is stored online for a minimum period of 8 years and archived thereafter.It has been developed as a role-based user access system that allows for complete and multi-level data security.
About the Manual
This manual describes the use of VitalZ-X tool with respect to HealthE application.
The contents are organized into these main sections:
- Introduction
- Overview of VitalZ-X
- Instruments and associated test available in VitalZ-X
- Troubleshoot
- Glossary
- Index
Instructions are given to the assumption that all users have VitalZ-X and accessibility to HealthE.
Overview of VitalZ-X
In VitalZ-X several tests are conducted on patient’s body fluids like blood and urine for getting information on the health condition of a patient to help in the healthcare screening, diagnosis and treatment. VitalZ-X uses different point of care equipment and to collect data and take measurements. This information helps to analyze the medical state of a patient and thus proper remedies can be taken.
VitalZ-X can be used by hospital, physicians, offices and in laboratories, and all these tests can be conduct in the authorized premises. It uses the variety of diagnosis instrument, each instrument designed for specific purpose.
VitalZ-X generate more than 230+ parameters within 15-20 minutes using only 5 drops of blood and 5 drops of urine. The tool is safe, easy to use and uses capillary blood while avoiding venous blood draw. It is built as an IoT (Internet of Things) infrastructure with the mobile application, HealthE. It uses a secured cloud-based architecture, which allows seamless data collection and distribution across different set of users such as healthcare providers/ workers/administrators, doctors, patients and individuals. See Figure 1.
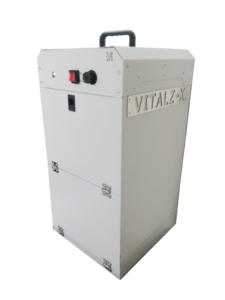
Figure 1 VitalZ-X
Please see the test covered and the equipment description in the table below:
Table 1. Test Covered
| Types of Test Covered | Parameters |
| General Health | Height, Weight, Temperature, Body Age, Ratios, Body Fat Compositions, Visceral Fat, BMI,
BAI, SBMI and net Body Fat |
| General Health / Anemia | Hemoglobin |
| Cardiac Function | Pulse |
| Cardiac Function | Systolic and Diastolic Blood Pressure |
| Diabetes | Random & Fasting Blood Sugar |
| Diabetes | HbA1c |
| Cardiac Function | Lipid (Cholesterol, LDL, HDL, Triglycerides, VLDL, LDL/HDL Ratio) |
| Kidney and Liver Function | Protein, Ketone, Glucose, Bilirubin, Urobilinogen, Leucocytes, pH, Density, Blood, Nitrite |
| Kidney Function | Blood creatinine |
| Pulmonary Function | SpO2 |
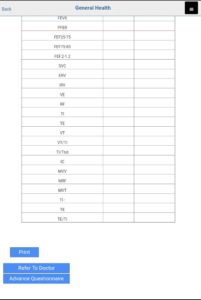
| Pulmonary Function | Pre, Post and Predicted -FVC, FEV.5, FEV1, FEV3, FEV6, PFER, FEF25-75, FEF75-85, FEF.2-1.2,
FEF25, SVC, ERV, IRV, VE, RF, TI, TE, VT, VT/TI, TI/Ttot, IC, MVV, MRF, MVT; Spirometer Graph and Analysis |
| Cardiac Function | ECG graph, ST Wave Abnormality, Ventricular Hypertrophy, Pulse Rate/Heart Rate, P Wave,
QRS, PQ, QT, QTc, QT/QTc, QT/RR, P Wave, QRS, T Wave |
Table 2. Equipment Description
| Equipment | Specification | Certifications |
| ECG | 1. 24 bits, 12 leads simultaneous acquisitions
2. Equipped with TISA (True Interpretation Sensitivity Algorithm) 3. Suitable for intra-cardiac use 4. Suitable for Resting and Realtime ECG Recording 5. Complete digital processing to reduce mains interference, muscle 6. tremors and baseline wanders 7. 5/10/20 mm/mV Sensitivity 8. 7. 3.2 Second Time Constant |
ISO 9001, ISO 13485,CE |
| SPIROMETER | 1. Measurement Method: Flow – Mouthpiece; Volume – FlowIntegration
2. Air Flow Range (L/Sec): -8 L/Sec to + 12 L/Sec 3. Max Volume Range: 5 Liters 4. Transducer: Bi Directional Turbine Cartridge 5. Calibration: Using a 3.0 L Calibration Syringe 6. Predicted Normal: Indian Predicted Equations, Barcelona, ECCS/ERS 7. 93, ITS-BLACK, ITS- WHITE, Knudson 83 LAM 8. Measurement Time: Up to 30 Seconds 9. Tests Performed: FVC, Pre/Post Testing, Flow Volume Loop, MVV,SVC |
ISO 9001, ISO 13485,
CE |
| LIPID PROFILER | 1. Full Lipid Panel in 90 seconds
2. Easy to Use 3. Patient friendly 4. Chip based calibration 5. Expiry date protection 6. Accurate pipette based capillary blood draw mechanism 7. Requirement of 40 micro liters of blood |
CE, US FDA |
| CREATININE
PROFILER |
1. Complete Result in less than 48seconds
2. Easy to Use 3. Patient friendly 4. Chip based calibration 5. Expiry date protection 6. Accurate pipette based capillary blood draw mechanism 7. Requirement of 1 mL of blood |
CE, US FDA |
| BP MONITOR | 1. Fully Automatic
2. Easy to Use 3. Error Message Display 4. Performance: Measurement Range: 0 kPa (0 mm Hg) – 38.67 kPa (290 mm Hg) 5. Resolution: 0.133 kPa (1 mm Hg) 6. Accuracy: 0.4 kPa (3 mm Hg) 7. NIBP PR Measure Range: 40 to 240 bpm |
CE, US FDA |
| GLUCO – KETONE
MONITOR |
1. Complete Result in less than 5 seconds
2. Easy to Use 3. Patient friendly 4. Chip based calibration 5. Expiry date protection 6. Accurate direct capillary blood draw mechanism 7. Requirement of 5 micro liters of blood |
CE, US FDA |
| URINE ANALYZER | 1. Temperature Range: 50 to 400 Celsius
2. Relative Humidity: 20 – 80% 3. Calibration: Automatic, Self-Calibrating 4. Zero touch operation 5. 50 tests per hour |
CE |
| HBA1C MONITOR | 1. Results in less than 300 seconds
2. Requirement of 5 micro liters of blood 3. National Glyco-Hemoglobin standardization program certified 4. Range: 5% to 12.8% with a mean of 7.3% A1c 5. Supplier’s Warranty – Accuracy: 99% 6. Imprecision: 3% CV at low level and 4.02% CV at High Level |
CE, US FDA |
| HEMOGLOBIN METER | 1. Time to Results< 15 seconds
2. Specimen Volume – 10 µL 3. Specimen Type – Capillary and Venous whole blood 4. Hb Measurement Range – 4.5-25.6 g/dL 5. Hct Range – 13-75% 6. Calibration – Automatic 7. Operating Conditions–10 – 40 ºC (50 -104 ºF); ≤90% RH
|
HealthE
HealthE App has as below components:
- HealthE Application for CARE PROVIDERS
- HealthE Application for DOCTORS
HealthE Application for Care Providers:
- Patient Enrollment – The module allows the care providers to enroll the patientfor various healthcare program based on the name, zip code, identity number and country code.
- Health Care Management – The module allows the care providers to manage the patient regularly and allow themto create their electronic health records seamlessly.
- Nursing Care – The module allows the care providers to monitor the patients with critical requirements and patientswith requirement of bed side assistance. It allows them to record and adhere to medicinal and therapeuticrequirements of the patients. It also allows the doctors and healthcare administrators to monitor the nursingactivities.
- Elderly Care – The module allows remote monitoring and onsite care of elderly patients along with managing theircritical and regular parameters.
- Wellness Management – The module allows the healthcare providers, corporate as well as public/governmentadministrators to manage and improve the employee or people’s health by applying and allocating various healthimprovement tools at their disposal.
Overall Functionality of Care Provider Application
Users performing the role of Care Provider User are responsible for the Enrollment of the patient after receiving online CareManagement Agreement, perform necessary Diagnostic/Therapeutic activities as per agreement, provide Medicalfacilitationwhere ever applicable, Follow Up methodically to ensure compliance where ever applicable, provide training andeducation to increase awareness.
Care Provider Schedules and monitors diagnostic check-ups for the patient on a regular basis as per the program protocolor as per the advice by the physician.
The care provider can scan and upload various reports their assigned patients online. They also have the facility to print thereports of their patients using Bluetooth based printers.
The mobile application also provides decision support alerts for the healthcare providers, administrator and doctors based onthe diagnosis results. For the patients it provides alerts for chronic diseases. The module also contains an access controlled,user-based dashboard of all the information about all enrolled patients. It provides data wise, area wise, disease wise, genderwise, state/district wise information. It also provides trend analysis and predictive analysis based on the mechanistic diseaseprogression.
HealthE Application for Doctors (Web Module and App Module):
- Patient Enrollment View – The module allows the Doctor to view the list of patients and their referral andappointment schedules online.
- e-Prescription – The module allows the Doctor to prescribe medicine and advise therapies online
- e-Alerts – The module allows the Doctor to receive alerts on their mobile about the health condition of their patientsfrom hospitals as well as home.
- e- Dashboard – The module displays the clinical condition, trends, medicinal usage, disease progression for all theirpatients collectively
Overall functionality provided in the Doctor (web and mobile application):
Doctor can have access to the patients who are assigned to them. Doctor have access to view patient’s diagnosis history. Doctor can add new prescription and can see any old prescription which are added or uploaded by any other doctorsprescribed for their own patients.
- Click on the HealthE Icon on the tablet to launch the Application. See Figure 2 HealthE Icon

Figure 2 HealthE Icon
- Enter the Login Credentials ‘Username’ and ‘Password’ in the space provided. See Figure 3HealthE Credential Field
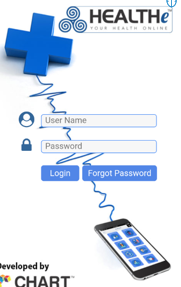
Figure 3HealthE Credential Field
- Make sure that the below screen appears. Click on the AvekxaTest. See Figure 4HealthE Home Page Screen.
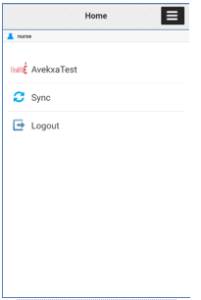
Figure 4HealthE Home Page Screen
- Make sure that the below screen of Application dashboard appears. Click on ‘Healthcare Management’. See Figure 5 Application Dashboard.

Figure 5 Application Dashboard
- Enter the Patient Name and Search then click on the link. See Figure 6 Patient Search Board.
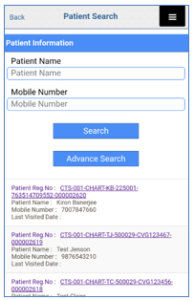
Figure 6 Patient Search Board
- Click on the “Add Diagnosis” Button in the Patient Management. See Figure 7 Patient Management Diagnosis Board.
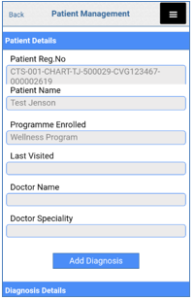
Figure 7 Patient Management Diagnosis Board
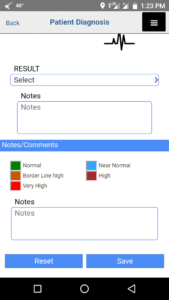
- Make sure that Patient Diagnosis Screen appears. Enter the General Data in the required field. See Figure 8 Patient Diagnosis Screen
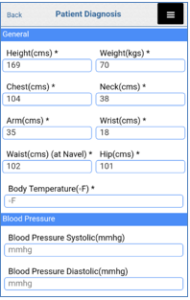
Figure 8 Patient Diagnosis Screen
Let’s discuss the uses, functionality and overview of each equipment with respect to HealthE in “Instruments and associated test available in VitalZ-X”
Warning and Cautions
BIOHAZARD
Take the utmost care when handling urine. This instrument uses urine as sample. Urine may be contaminated by pathogenic microbes that can cause infectious diseases. Improper handling of urine may cause infection to the user or other individuals by pathogenic microbes.
This instrument is to be operated by qualified persons only. A qualified person is one having adequate knowledge of clinical testing and the disposal of infectious waste.
Never touch the test strip holder or other parts where the sample may adhere with unprotected hands. During cleaning or maintenance of these parts, wear protective gloves to prevent exposure to pathogenic microbes.
Discard used samples, test strips and protective gloves in accordance with local regulations for biohazardous waste.
Danger:
Explosion hazard! Do not use this equipment in the presence of flammable anesthetics or other flammable substance in combination with air, oxygen-enriched environment or nitrous oxide.
Do not place the machine in any position that may cause it to fall on the patient. Do not lift the machine by the USB cable
CAUTION: Do not disassemble or attempt to repair the unit or components. Otherwise it cannot gain accurate measurement.
General Safety Information
CAUTION: Do not place the machine in any position that may cause it to fall on the patient. Do not Lift the Machine by the power cord. Use handle for this purpose.
CAUTION: If machine does not operate manually or is damaged. Please do not use the machine to acquire data from the patient. Contact your nearest service center.
CAUTION: Do not disassemble or attempt to repair the unit or components. Otherwise it cannot gain accurate measurement.
CAUTION:Instruments may become infectious while use. Discard the instrument in accordance with local regulations for biohazardous waste.
WARNING: All consumables of the VITLAZ system is potentially biohazardous. Dispose of as biohazardous waste.
WARNING: Handle properly, otherwise potentially hazardous situation may result in injury to the user or patient or damage to the equipment or other property.
Electrical Safety Information
- Electric shock hazard! Do not remove covers or panels. Refer service to qualified service personnel.
- To avoid electrical shock, disconnect the Machine from its power source after changing fuses. Replace fuses only with same type and rating.
- Do not clean machine while it is on/plugged into a power source.
- If unit is accidentally wet, disconnect the machine from its power source before changing fuses. Replace fuses only with same type and rating.
- This unit uses a common isolation path for the leads. Do not connect any unisolated accessories to the Machine input when connected to a patient, as this may compromise the safety of the unit. When attached to other devices, ensure that the total chassis leakage currents of all units do not exceed 300μ
- The equipment should not be placed near electrical generator, X-Ray machines, broadcasting apparatus to eliminate electrical noise during operation.
Danger:
Explosion hazard! Do not use this equipment in the presence of flammable anesthetics or other flammable substance in combination with air, oxygen-enriched environment or nitrous oxide.
Important:
- Only use a test strip once.
- Read the test strip instructions for use before performing your tests. It contains important information and will tell you how to store and handle the test strips.
- Any meter and its respective accessories are for use by single person for a single person at a time.
VitalZ-X Operating Procedure:
- Connect Power Supply to VitalZ-X.
- Press VitalZ-X Power button on.
- Switch-On the devices in VitalZ-X.
- Switch on the tablet provided for HealthE Application.
- Enable Bluetooth in the tablet, check whether its paired to printer or not.
- Press the Reset button to reset the Processor in VitalZ-X.
- Click on HealthE Application in the tablet, Enter Login details – Username & Password which are provided to you.
- Dashboard Screen will be displayed, Click on Patient Enrollment Icon.
- Enter Patient Information and Contact Information with Clear Picture.
- Complete all the Entries and Click on ‘Next’ Button.
- Answer all the Questionnaire and Click ‘Next’ Button.
- Patient Diagnosis Screen will be displayed.
- Take the Body measurements of the patient as per application fields.
- Check the Body temperature of the Patient and enter in the app temperaturefield.
- Application fields will be enabled based on temperature for testing furtherly.
- Enter all the General Data in Patient Diagnosis Screen.
- Now Open the Appropriate rack for testing:
- Urine Analyzer
- Electrocardiograph
- Spirometer
- Blood Pressure Monitor
- HBA1C
- LIPID Profiler
- Creatinine Profiler
- Glucometer
- Hemoglobin Meter
- Perform the testing as per requirement.
- Fetch the Required Diagnosis Data in Patient Diagnosis Screen by clicking the appropriate buttons in the application screen page.
- Click on the ‘Save’ Button.
- Informed Consent Page will be displayed, Capture Patient Picture for Confirmation.
- Click on ‘I Agree’ Button, General Health Screen will be displayed.
- Connect the printer with Bluetooth. Check the printer for on/off mode.
- Click ‘Print’ Button for “Instant Screening Report”, wherein we’ll get a physical printout.
- For New Patient Enrollment, Click on Hamburger Menu Button -> Home -> Patient Enrollment Icon.
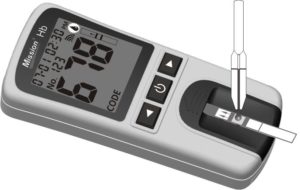
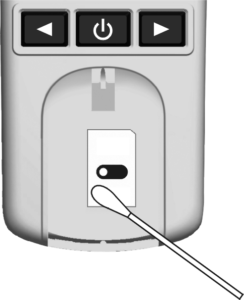
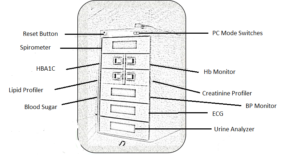 Figure 9 VitalZ-X Nomenclature
Instruments and associated test available in VitalZ-X
Urine Analyzer
Warning: Follow the instructions given here to prevent exposure to pathogenic microbes.
Warning: Follow the instructions given here to prevent injury and property damage.
Important: Follow the instructions given here to obtain accurate measurement results.
Note: Test fresh urine samples within 2 hours of collection. Refrigerated urine samples must be brought to room temperature before testing (15-30 C).
Performing a Urine Test:
Connect the VitalZ-X and turn the equipment on with the on/off-switch. After the self-test the start screen will appear on the display. See Figure 10Start Menu.
Figure 10 Start Menu
Follow the below steps to perform the Urine Test
- Dip a test strip into the urine sample for approx. one second.
- Blot by touching the edge of the strip to a paper towel to remove excess urine.
- Place the strip on the strip holder.
- Slide or push the strip to the end of the channel. Do not touch the reagent pads on the test strip.
- The instrument will automatically detect an applied strip. The measurement cycle will be started. A progress bar on the display shows the remaining measurement time.
Test Result
At the end of the measurement the result will be displayed on the application screen. Follow the below steps for the test result
- Click on the Fetch Button on the application. See below Figure 11 Urine Analyzer Fetch Button.
![]()
Figure 11 Urine Analyzer Fetch Button
Note: Please refer to Section HealthE, if you find any difficulty while operating.
- Make sure that the result will be displayed on the application screen. at the end of the measurement. See Figure 12 Application Urine Result.
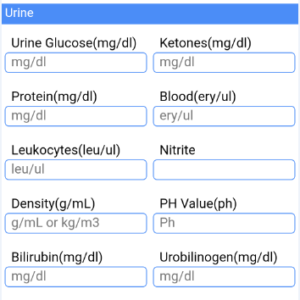 Figure 12 Application Urine Result
- Choose the return panel to
 lead back to the start screen.
Daily Maintenance
Clean the strip holder with water and disinfectant once daily. Pull the strip holder to remove it from the instrument. Rinse the holder with water. Remove any crystalline deposits with a soft brush. Wipe down the strip holder with 70% alcohol or other suitable disinfection. Dry with a soft cloth. Insert the holder into the instrument.
Quality Control
Test negative and positive control solution whenever a new bottle of strips is opened.
Do not use water as negative control.
Electrocardiograph
General Safety Information
This section contains important safety information related to general use of the ECG Machine
Before use, carefully read these manual, necessary directions for use and specifications.
CAUTION: If ECG machine does not operate manually or is damaged. Please do not use the machine to acquire data from the patient. Contact your nearest customer service.
Electrical Safety Information
CAUTION: This product is intended to be operated from a main power source.
- Electric shock hazard! Do not remove covers or panels. Refer service to qualified service personnel.
- Do not clean ECG machine while it is on/plugged into a power source.If unit is accidently wet, disconnect the VitalZ-X power source and call for customer service
- This unit uses a common isolation path for the ECG leads. Do not connect any unisolated accessories to the ECG input when connected to a patient, as this may compromise the safety of the unit. When attached to other devices, ensure that the total chassis leakage currents of all units do not exceed 300μ
Operation of Electrocardiograph
- Press on/off switch on the front panel.
- Pressing ‘Man’ button to set manual or auto mode
- Edit the patient name by pressing ‘Menu’ button shown below. To patient information / enter to accept or menu to discard, Press ‘Menu’ button to return to main menu.
- Edit date by pressing ‘Menu’ button then go to setting option then go to the date and press enter after selection the option appear touch keypad, select DD/MM/YY.
- ID – To edit the ‘ID’ Select ‘ID’ and press ‘enter’ user can edit the ID by touching key the alphanumeric key the use can ID. Press ‘Menu’ button to return to main menu.
- Sex, Age and weight – To edit sex, age and weight select (Sex, age and wt) and press ‘Enter’ select for M/F, put the age and weight by touching button press ‘Menu’ button to return to main menu.
- By – The user can add the name of the reference by selecting the ref options by pressing up and down key and then press ‘Enter’ user can edit the Dr Name by touching key pad. Press ‘Menu’ button to return to main menu.
- Remarks-I: To enter the remarks user can select the remark option and press ‘Enter’ user can edit the remark by touching key, Press ‘Menu’ button for return to main menu.
- Remarks-II: To enter the remarks user can select the remark option and press ‘Enter’ user can edit the remark by touching key, press ‘Menu’ button for return to main menu.
- Remarks- III: To enter the remarks user can select the remark option and press ‘Enter’ user can edit the remark by touching key, press ‘Menu’ button for return to main menu.
- Hospital and Doctor Name – User can enter name of the Hospital and Doctor by pressing menu key the go to Hospital options by using up and down key then enter, selecting ‘Hospital’ press enter put the Hospital and Dr. name by touching touch pad, Press ‘Menu’ button for return to main menu.
- Attach the patient cable to the patient body. See Figure 13 Patient Cable Connections.
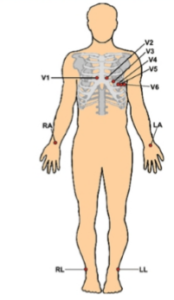
Figure 13 Patient Cable Connections
13. Select the display from the different display design i.e.
14. Auto mode: 3×4+Rhythm Lead, 3×4, 2×6, 12 LeadFormat
15. Manual Mode: 3 Lead, 6 Lead, 12 Lead formats on pressing the keypad display witch. The display and theprintout will be the same
16. Check the screen the waves should be clear without any Zigzag on the screen as shown in figure.
17. Once the waves are clear, give the printout command by pressing start key.
Test Result
At the end of the measurement the result will be displayed on the application screen.
Follow the below steps for the test result
- Click on the Fetch Button on the application. See below Figure 14 Electrocardiograph Fetch Button.
 Figure 14 Electrocardiograph Fetch Button
Note: Please refer to Section HealthE, if you find any difficulty while operating.
- Make sure that the result will be displayed on the application screen. at the end of the measurement. See Figure15 ECG Test Result.
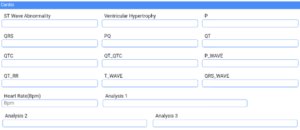
Figure 15ECG Test Result
Spirometer
This section contains important safety information related to general use of
the SpiroTech+. Before use, carefully read this manual, accessory directions for use and
specifications.
Electrical
- This product is intended to be operated on Power.
- Do not remove any sticker. Refer service to qualified servicepersonnel
- Do not clean the machine while it is On.
- If machine is accidentally wet, discontinue use until dry andthen test the machine for proper operation before reuse onpatient.
- Do not install or use this product near water.
Operation of Spirometer
- When you press ON/OFF button the following window appears on the screen. See Figure 16FrontWindow.
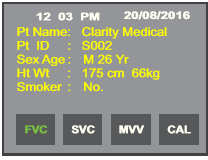
Figure 16FrontWindow
- On pressing menu button Main Menu window appears on the screen. See Figure 17Main Window
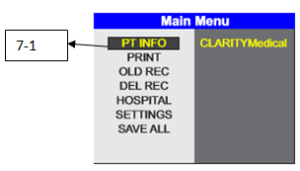 Figure 17Main Window
- In the main menu, select the ‘PT INFO’ (7-1) by scrolling up or down and pressing ‘Enter’.The following window appears after selecting the Patient info option. See Figure 18Pt Info Window
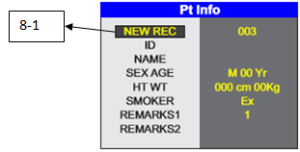
Figure 18Pt Info Window
- New Record- To create the new record, select ‘NEW REC’(8-1) and press ‘Enter’
- ID: User can edit the ‘ID’ no. of the patient by pressing the required numbers from the keypad. See Figure 19Keypad
- For erasing the previous entry, the user can press ‘>’ button.
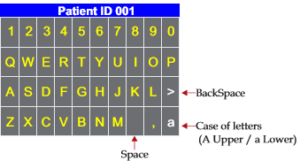
Figure 19Keypad
- For small capital letters press ‘a’. For space press ‘ ’ . Aftermaking entry Press Menu button.
- To save the entries user should press ‘Menu’ and then the SAVE ALL’ button option in the main menu
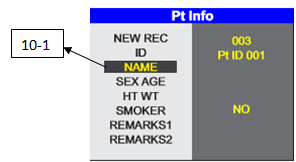
Figure 20Pt Info (NAME)
- Name: To edit the patient name, select ‘NAME’ (10-1) and press ‘Enter’. See Figure 20Pt Info (NAME).
- User can edit the name by pressing the alphanumeric keyspresent on the keypad. The user can either erase the defaultname by pressing the Back button or replace the alphabetsby using left or right scroll keys. After making this entry pressMenu Button. See Figure 21Screen.

Figure 21Screen
- To save the entries user should press Menu and then selectthe ‘SAVE All’ option in the main menu.
- Sex & Age- To edit sex & age, select SEX AGE (12-1) and press ‘Enter’. See Figure 22Pt Info.
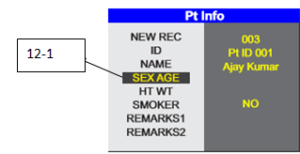
Figure 22Pt Info
- Press M for male and F for female. Then enter value for ageand press Yr. See Figure 23Calendar Menu
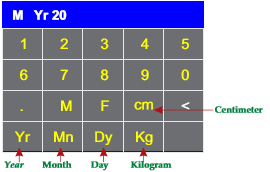
Figure 23Calendar Menu
- Height & Weight- To edit Height & Weight “HT WT “and press ‘Enter’
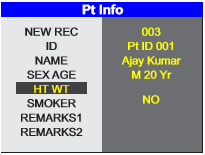
Figure 24Pt Info
Scroll to SMOKERPress enter to change Values (Yes, No, Ex): By default, no appears on the screen. See Figure 25 Smoker Screen.
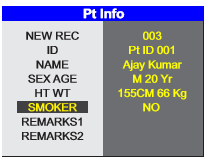 Figure 25 Smoker Screen
Test Result – Pre-Lung
At the end of the measurement the result will be displayed on the application screen Follow the below steps for the test result
- Click on the Fetch Button on the application. See below Figure 26 Spirometer Fetch Button.
 Figure 26 Spirometer Fetch Button
Note: Please refer to Section HealthE, if you find any difficulty while operating.
- Make sure that the result will be displayed on the application screen. at the end of the measurement. SeeFigure27 Application Spirometer Result – Pre lung.
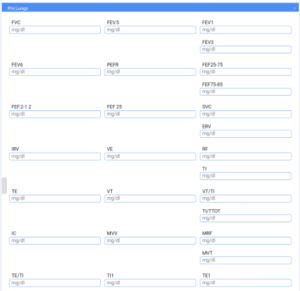 Figure 27 Application Spirometer Result – Pre lung
Test Result – Post-Lung
At the end of the measurement the result will be displayed on the application screen.
Follow the below steps for the test result
- Click on the Fetch Button on the application. See below Figure 28 Spirometer Fetch Button.

Figure 28 Spirometer Fetch Button
- Make sure that the result will be displayed on the application screen. at the end of the measurement. See Figure 29 Application Spirometer Result – Post lung.
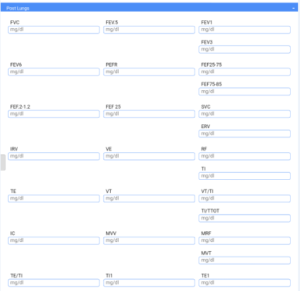 Figure 29 Application Spirometer Result – Post lung
BP Monitor
This section contains important safety information related to general use of the BP Monitor
Before use, carefully read this manual, accessory directions for use and specifications.
CAUTION: Contact your physician for specific information about your blood. Please hand measurement results to the doctor who knows your health to accept diagnosis. For severe blood circulation disorder or arrhythmia patients, please use the device under the guidance of a doctor. Otherwise it may lead to acute hemorrhage, or measurement error as a result of squeezed arm.
CAUTION:This device is intended for using in measuring blood pressure and pulse rate. Do not use for any other purpose. Other wise it may cause accidentor hold back.
CAUTION: Please use special cuff. Otherwise it is possible that measurement result is incorrect.
Date and Time – Setting
If correctly use data upload function:
- Turn on the device to enter the main interface. See Figure 30Main Interference Window
Figure 30Main Interference Window
- Press 【SETUP】 button to enter the setup date and time, LCD willdisplay2009. See Figure 31Data and Time Display.
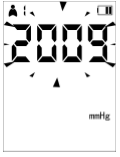
Figure 31Data and Time Display
- Every press 【UP】 button to make the number increase 1, press 【DOWN】 buttons to make the number reduce 1
NOTE: The year can be set between 2000and 2099. When the display reaches 2099, it will return to 2000.
- When displaying year on the screen, press 【SETUP】 button to confirm the setup value, and enter the next step, if you want to end the setup, press 【MEMORY】 See Figure 32Display.
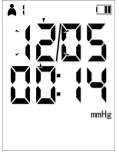 Figure 32Display
- Repeat the 3 and 4 steps to set month and day.
- Repeat the 3 and 4 steps to set hour and minute.
- After completing the above steps, press 【SETUP】/【MEMORY】 button to end. Reset the date and time
ARM Cuff – Apply
When measuring, take the thick clothes off instead of rolling up the sleeves. In order to, measure accurately,pay attention to applying the cuff properly (leftarm).
- Make sure that the air plug is securely inserted in the main unit. See Figure 33 Air Plug.
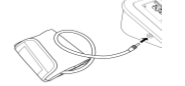
Figure 33 Air Plug
- Stretch cuff into a barrel, as the arm can conform able enter into the barrel. See Figure 34 Barrel.
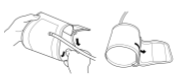
Figure 34 Barrel
- Arm penetrate throughthecuff, the air tube of the cuff will pass the top of your palm. See Figure 35 Arm thru Cuff.
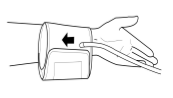
Figure 35 Arm thru Cuff
- Apply the cuff to your upper arm. The color marker is on the inside center of your arm and make the air tube aligned with your middle forger. See Figure 36 Cuff thru Upper Arm.
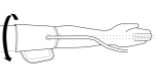
Figure 36 Cuff thru Upper Arm
- The bottom of the cuff should be approximately 2cm~3cm above your elbow. See Figure 37 Cuff Bottom.
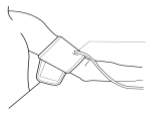
Figure 37 Cuff Bottom
- Be fixed with cloths, and wrapped tight cuff, the arm and the cuff should not have gaps. See Figure 38 Cuff Tighten.
Figure 38 Cuff Tighten
BP Measurement Process
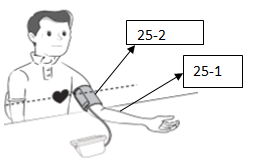
Figure 39 BP measurement Process
- Place your arm (25-1) on a table.SeeFigure 39 BP measurement Process.
- The cuff (25-2) is level with your heart.
- The palm of the hand is up, and the bodies relax.
BP Measurement on Machine
- Press 【START/STOP】(26-1) button to take a measurement. See Figure 40 BP Measuring Process Flow.
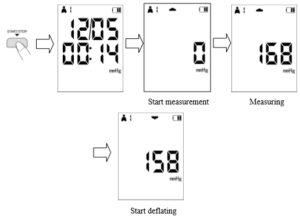
Figure 40 BP Measuring Process Flow
- End measurement after displaying measurement values. See Figure 41 End Measured Display.
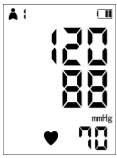
Figure 41 End Measured Display
- Confirm measurement value. This value can be automatically stored.
- Press any button to return the date and time interface.
- Take down cuff, press【ON/OFF】 button to turn the device off.
Memory Value – Review
- Press 【MEMORY】 button can display the recent measurement results. When numerate the memory values, display the memory values number from 1 to 99. M shows the memory value, number shows the measurement time. See Figure 42 Measured Time Display.
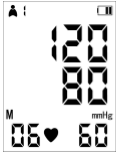
Figure 42 Measured Time Display
- Every time press 【UP】/ 【DOWN】 button to circularly switch the former measurement values. See Figure 43 Button.

Figure 43 Button
- Press 【USER 1】 button to switch the users to view the memory result.
- End to display the measurement values.
Press 【MEMORY】 to return the time interface or press 【ON/OFF】 button to turn the power off. * The device will automatically turn off after five minutes in which there is no operation to the device, even if you forget to turn the power off.
Memory Value – Delete
User cannot partially delete values stored in the memory. All values of every user will be deleted.
- During numerate the measurement record.
- Press【SETUP】button for more 5seconds to delete all measurement results of the current userEnd User. See Figure 44 End User Interface.
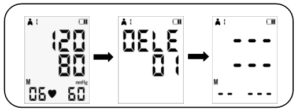
Figure 44 End User Interface
- Press 【MEMORY】toreturnthetimeinterface,orpress【ON/OFF】buttonto turn the power off. The device will automatically turn off after five minutes in which there is no operation to the device, evenifyouforgettoturnthepoweroff.
Monitoring Procedure
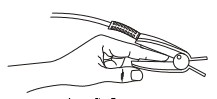
Figure 45 Sensor Check
- Attach the sensor (31-2) to the appropriate site of the patient finger. See Figure 45Sensor Check.
- Plug the connector of the SpO2 probe cable (31-1) into the USB socket on the lower right of Electronic Sphygmomanometer.
Maintenance and Cleaning
- Use a cotton ball or a soft mull moistened with hospital-grade ethanol to wipe the surface of the SpO2 probe, and then dry it with a cloth. This cleaning method can also be applied to the luminotron and receiving unit.
- The cable can be cleaned with 3% hydrogen dioxide, 70% isopropanol, or another active reagent. However, connector of the SpO2 probe shall not be subjected to such solution.
Test Result – BP Monitor
At the end of the measurement the result will be displayed on the application screen. Follow the below steps for the test result
- Click on the Fetch Button on the application. See belowFigure46BP Monitor Fetch Button.

Figure 46BP Monitor Fetch Button
Note: Please refer to Section HealthE, if you find any difficulty while operating.
- Make sure that the result will be displayed on the application screen. at the end of the measurement. SeeFigure47BP Monitor Result.
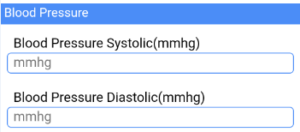
Figure 47BP Monitor Result
HBA1C
This section contains important safety information related to general use ofthe HBA1C.
Before use, carefully read these manual, accessory directions for use andspecifications.
WARNING: The A1CNow+ Monitor and Test Cartridges should not be used if either is cracked or broken.
WARNING: The Test Cartridges should not be used if the foil pouch is damaged.
WARNING: All components of the A1CNow+ system is potentially biohazardous. Dispose of as biohazardous waste.
WARNING: The Dilution Buffer in the Sampler contains ferricyanide in a buffered detergent solution. Do Not Ingest. In case of contact with skin or eyes, flush the area with large amounts of water.
Run A1CNow Tests – Operating Procedure
- Preparation
- Run the test with all parts of the test kit at the same temperature:18-28ºC/64-82ºF.
- If the kit has recently been at high temperatures (above 82ºF) or in the refrigerator, keep the kit at room temperature for at least one hour before use.
- Avoid running the test in direct sunlight, on hot or cold surfaces, or near sources of heat or cold.
- Quality control materials should be used to confirm the test kit is working properly. Refer to the product insert for information on when to run controls.
- Complete the test within 15 minutes.
- Blood Collection
Fingerstick
- Use your own lancet device to draw blood
- Gently touch the tip of the blood collector to the blood drop to fill
Venous Draw
- Mix heparinized blood well before testing
- Hold the blood collector at a 45°angle to collect blood
- Blood Dilution:Insert Blood Collector
- Fully insert Blood Collector into Sampler Body
- Push firmly
- Keep pushing, a twisting motion helps
- Shake
- Shake well 6-8 times: This will mix the blood with the solution
- Stand Sampler on table while preparing Cartridge
- Insert Cartridge
- Open the Test Cartridge pouch
- Use within 2 minutes of opening the pouch
- Insert the Test Cartridge into the Monitor until the Cartridge is CLICKED into place
- Monitor and Test Cartridge codes must match
Note:If codes do not match, call Customer Service.
- Blood Testing:Prepare Sampler
- Wait for “SMPL” to display on the Monitor
- When Monitor displays “SMPL,” it is ready for the sample.
- Remove the base of the Sampler
- Ensure the Monitor is on a level surface
- Dispense the sample into the cartridge
- Place the tip of the plunger into the corresponding hole in the Test Cartridge
- Push down completely to dispense diluted sample
Note: Remove quickly after the sample is dispensed.
- Do not handle Monitor again until test is complete
- Results will display in five minutes
- The Monitor counts down from five minutes
- After the countdown, the display will cycle:A1C result, “QCOK,” and number of tests left
- This result cycle remains displayed for 60 minutes or until the next Test Cartridge is inserted.
- If “QCOK” is not displayed, please see list of error codes under troubleshooting section in the Professional Procedure Guide.
- Reuse of Monitor
- Save Monitor
- Discard Test Cartridge
- To run another test, use a new Sampler and Test Cartridge from the same kit.
- Procedural Notes
- The Lot number on the Monitor, Test Cartridge pouch, and Sample Dilution Kit should always match.
- Use Monitor only with the materials included in the original kit.
- The Monitor will expire after the programmed number of tests has been run.
Note: If another Test Cartridge is inserted, the Monitor will display “00 TL.”
Note: follow the instructions given in below before working with LIPID PROFILER/Creatinine Profiler, HB1AC and Glucometer.
Helpful Hints on Getting a Good Drop of Blood
- Instruct the patient to wash hands in warm, soapy water.
- Rinse well and dry completely. If an alcohol wipe is used, let the finger air dry before testing. Clean gauze may be used to dry alcohol.
- Warm the fingers to increase blood flow.
- Let the arm hang down at the patient’s side briefly to allow blood flow to the fingertips.
How to Obtain a Blood Sample from a Fingerstick A new pair of clean gloves should be worn by the user before testing each patient.
- Use either the middle or ring finger for finger sticking.
- Select the site to allow for convenient collection.
- Clean the site with an alcohol wipe.
- Apply gentle pressure to the finger with lancet and stick the finger left or right of center.
- Gently apply pressure (squeeze and release) to the finger to produce a large drop of blood. Note: Avoid milking the finger. This may cause tissue fluid dilution or hemolysis and affect the accuracy of results.
- Use cotton or gauze to wipe away first drop for all test strips.
- Hold the capillary tube just below the bulb and level with the angle of the finger.
Note: Do NOT squeeze the bulb during collection if applicable.
- Place the tip just touching the drop of blood allowing the capillary action to draw the blood into the capillary tube until sample reaches the fill line.
Precaution: Handle and dispose of all materials encountering blood according to universal precautions and guidelines. All parts of the system should be considered potentially infectious and can transmit bloodborne pathogens between patients and healthcare professionals.
It is recommended that users refer to the following practice guidelines:
Biosafety in Microbiological and Biomedical Laboratories (BMBL) found at http://www.cdc.gov/biosafety/publications/bmbl5/.
“Protection of Laboratory Workers from Occupationally Acquired Infections; Approved Guideline-Third Edition” Clinical and Laboratory Standards Institute (CLSI) M29-A3.
Test Result – HBA1C
At the end of the measurement the result will be displayed on the application screen. Follow the below steps for the test result
- Click on the Fetch Button on the application. See below Figure 48 BP Monitor Fetch Button.
Figure 48HbA1C Monitor Fetch Button
- Make sure that the result will be displayed on the application screen at the end of the measurement. See Figure 49HbA1C Monitor Result.
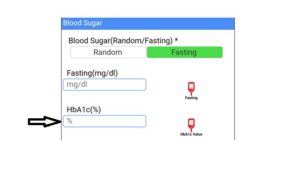 Figure 49HbA1C Monitor Result
Lipid Profiler and Creatinine Profiler
Set-up
CardioChek PA Analyzer Menus
The following diagram provides a layout of the menus within the CardioChek PA analyzer. Detailed information on the use of each menu follows. Use the following buttons to navigate the menus. SeeFigure50 Features of CardioChek PA Test System.
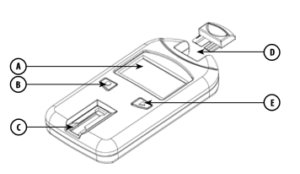 Figure 50 Features of CardioChek PA Test System
SeeFigure51 Flow Chart.
Display (A): –Display shows test results, messages, time, date and stored results
Enter Button (B): Press this button to turn on the analyzer or to accept the current menu choice.
Test Strip Slot (C): – The test strip slot is positioned in the lower front of the analyzer. The test strip and/or check strip is inserted here with the raised lines facing up.
MEMo Chip Port (D): –The MEMo Chip port is located at the top of the analyzer.
Next Button (E): – Press this button to turn on the analyzer or to advance to the next menu option.
Note: Hold Enter ButtonandNext button down at the same time for three seconds to turn off the analyzer.
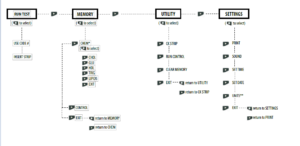
Figure 51 Flow Chart
How to Turn Off the Analyzer
To turn off the analyzer, press both buttons (Enter and Next) at the same time for three seconds. After three minutes of idle time (without a test strip or check strip inserted), the analyzer will perform a 10-second countdown and turn off. To stop shutdown, press either button. You can also remove the batteries to turn off the analyzer.
How to Set the Language (First-Time Use)
- Turn on the analyzer by pressing either button (Enter or Next)
- The display will read LANGUAGE. Press Enter.
- ENGLISH will be displayed. Press Enter if English is desired.
- For other languages press next until the desired language is displayed, then press Enter.
How to Reset the Language
- Turn off the analyzer.
- Press and hold down Enter for approximately 5 seconds during the analyzer power-up stage until LANGUAGE is displayed.
- Press Enter. Press Enter again to select English or press Next to scroll through the language choices.
- Press Enter to select the desired language that is displayed.
How to Set the Time
- If the analyzer is off, press either button to turn on the analyzer. Wait for the display to read either INSTALL MEMO CHIP (if a current MEMo Chip is not installed) or INSERT STRIP (if a current MEMo Chip is installed). Press Enter.The display will read RUN TEST.
- Press Next until SETTINGS is displayed.
- Press Enter. Press Next until SET TIME is displayed.
- Press Enter and the clock format is displayed: 12/24 HR.
- Press Next to alternately display the 12-hour AM/PM clock or the 24-hour clock. Press Enter to accept the displayed clock format. The display will read HOUR and the numerical hour. If 12-hour clock was chosen, AM/PM appears in the lower left-hand corner of the display.
- Press Next to increment the hour.
- Press Enter to accept the displayed hour. The display will read MINUTE and the numerical minute.
- Press Next to increment the minutes.
- Press Enter to accept the displayed minute. The display will read SET TIME.To set the date, proceed to How to Set the Date – Step 4.
- To exit, press Next until EXIT is displayed. Press Enter.
- Press Next to return the display to RUN TEST.
How to Set the Date
- If RUN TEST is displayed, go to Step 3. If the analyzer is off, press either button to turn on the analyzer. Wait for the display to read INSTALL MEMO CHIP orINSERT STRIP.
- Press Next. The display will read RUN TEST.
- Press Next until SETTINGS is displayed. Press Enter.
- Press Next until SET DATE is displayed.
- Press Enter and the numerical month is displayed.
- Press Next to increment the month.
- Press Enter to accept the displayed month. The display will read DAY and the numerical day of the month.
- Press Next to increment the day.
- Press Enter to accept the displayed day. The display will read YEAR and the numerical year.
- Press Next to increment the year.
- Press Enter to accept the displayed year. The display will read SET DATE.
- Press Next until EXIT is displayed. Press Enter.
- Press Next to return the display to RUN TEST.
How to Set the Units
The CardioChek PA analyzer may be shipped with preset units.
Note: If the SETTINGS menu does not display “UNITS,” the analyzer is locked in preset units.
- The units cannot be changed if the system has been locked
- To confirm current configuration of the analyzer’s units, run a check strip in the RUN TEST mode and observe the units that are displayed
If your analyzer’s units have not been preset, follow the steps listed below to change your units to mg/dL, mmol/L, or g/L:
If RUN TEST is displayed, go to Step 3. If the analyzer is off, press either button to turn on the analyzer. Wait for the display to read INSTALL MEMO CHIP orINSERT STRIP.
- Press Enter. The display will read RUN TEST.
- Press Next until SETTINGS is displayed.
- Press Enter. The display will read PRINT.
- Press Next until UNITS is displayed. If UNITS is not shown on the display, the units on this analyzer have been locked and cannot be changed. If UNITS appears on the display screen, proceed to the next step.
- Press Enter. The display will read mg/dL. If mmol/L or g/L is desired, press Next until the desired unit appears on the display screen.
- Press Enter to select the desired units. The display will then read UNITS.
- Press Next until EXIT is displayed.
- Press Enter to return to SETTINGS.
- Press Next to return to RUN TEST.
How to Set the Sound
The CardioChek PA analyzer sound has been preset to BEEP ON. To turn the sound on or off, please follow the steps listed below:
- If RUN TEST is displayed, go to Step 3. If the analyzer is off, press either button to turn on the analyzer. Wait for the display to read INSTALL MEMO CHIP orINSERT STRIP.
- Press Next. The display will read RUN TEST.
- Press Next until SETTINGS is displayed.
- Press Enter, then Next until SOUND is displayed.
- Press Enter. The display will read BEEP ON or BEEP OFF.
- Press Next to select either BEEP ON or BEEP OFF.
- Press Enter to accept the sound choice displayed.
- Press Next until EXIT is displayed.
- Press Enter to return display to SETTINGS.
- Press Next to return to RUN TEST.
How to Use the Analyzer Check Strip:
- Turn on the analyzer by pressing either button.
- When INSTALL MEMO CHIP or RUN TEST is displayed, press Next until UTILITY is displayed. Press Enter.
- Press Enter when CK STRIP is displayed.
- Hold the check strip at the base and insert the check strip, ribbed side up, into the test strip slot when INSERT STRIP is displayed.
- The analyzer should display PASSED. (If the display reads FAILED, see the note at the end of this section.) Remove the check strip and store it in the analyzer carrying case.
- Press Next until EXIT is displayed. Press Enter.
- Press Next until RUN TEST is displayed.
- Press Enter. The analyzer is ready to run tests.
Note: If the analyzer displays FAILED:
- Clean the CardioChek PA analyzer test strip slot (where the check strip is inserted into the analyzer). See Section 8, Care and Cleaning.
- Inspect the check strip to make sure it is not dirty or damaged.
Running a Test
Blood Testing
A test strip package insert is included with each box of test strips. Please read the test strip package insert and this section of the user guide completely and carefully before testing.
Testing Supplies
To perform a blood test, you need:
- Cardio Chek PA analyzer
- Panel Test strips
- Lot-specific MEMo Chip
- Sterile, auto-disabling, single-use lancet
- Pipet or capillary blood collector
- Gauze or cotton balls
- Alcohol wipe
This analyzer requires whole blood for testing. Do not operate the analyzer in direct light. See Section 8, Care and Cleaning for more information.
How to Obtain a Blood Sample from a Fingerstick
WARNING: A new pair of clean gloves should be worn by the user before testing each patient otherwise can cause damage to skin.
- Use either the middle or ring finger for finger sticking. See Figure 52 Finger sticking.

Figure 52 Finger sticking
- Select the site to allow for convenient collection.
- Clean the site with an alcohol wipe.
- Apply gentle pressure to the finger with lancetand stick the finger left or right of center.
- Gently apply pressure (squeeze and release) to thefinger to produce a large drop of blood. See Figure 53 Squeeze Finger.
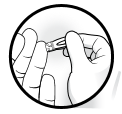 Figure 53 Squeeze Finger
Note: Avoid milking the finger. This may cause tissue fluid dilution or hemolysis and affect the accuracy of results.
- Use cotton or gauze to wipe away first drop for alltest strips.
- Hold the capillary tube just below the bulb andlevel with the angle of the finger. See Figure 54 Capillary Tube Ejection.
Note: Do NOT squeeze the bulb during collection if applicable.
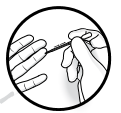
Figure 54 Capillary Tube Ejection
- Place the tip just touching the drop of blood allowing the capillary action to draw the blood into the capillary tube until sample reaches the fill line.
How to Run a Test
- Press either button to turn the analyzer on.
- Remove the MEMo Chip from the box of test strips.
- Insert the MEMo Chip in the port at the top of the analyzer with the lot code number facing down. See Figure 55Inserting MEMO Chip.
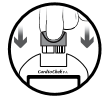
Figure 55Inserting MEMO Chip
- When INSERT STRIP is displayed, remove a test strip from the vial and immediately replace the cap.
- Insert the strip. Ensure that the test strip is inserted fully, and the display reads APPLY SAMPLE.
- Obtain a blood drop following the correct technique. (If venous blood is used, collect in an EDTA or heparin tube.Invert gently 5-7 times to mix completely. Immediately collect sample with capillary tube or precision pipet and dispense correct volume* as specified in test strip instructions for use (package insert) on to the test strip.)
- Hold the capillary tube by the bulb and position above the blood application window on the test strip. Use care to avoid touching the test strip with the capillary tube. Squeeze the bulb gently to deposit the entire sample on the strip. See Figure 56 Capillary Tube Hold.
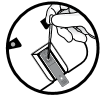 Figure 56 Capillary Tube Hold
- Once the sample is applied, results will appear on the analyzer display in about 90 seconds depending on type of test strip.
- Remove test strip and dispose of properly.
- If the analyzer is idle for more than 3 minutes, it will count down 10 seconds and automatically turn off on display.
Care and Cleaning
Storage and Handling
- Handle the CardioChek PA analyzer with care; do not drop.
- Do not store or operate the analyzer in direct light, such as sunlight, spotlight, under a lamp, or by a window.
- Do not expose the analyzer or any of the supplies or accessories to high humidity, extreme heat, cold, dust, or dirt. The analyzer may be stored at a temperature of
- 50-104ºF (10-40ºC) and 20-80% Relative Humidity (RH). Do not freeze.
- If storage temperature is below 68ºF (20ºC) allow the device to warm to room temperature 68ºF (20ºC) before using. If the device has been stored under excessive conditions, allow at least 30 minutes at room temperature for the device to equilibrate to these temperatures.
- Do not scratch or damage the surface of the check strip.
- Please read the test strip package insert for storage and handling information that applies to each test strip.
Cleaning and Disinfection
Cleaning and disinfection of analyzers that encounter blood or blood products is critical to avoid transmitting bloodborne pathogens between patients and healthcare professionals.
IMPORTANT SAFETY INSTRUCTIONS: It is critical to properly clean and disinfect analyzers that are used with blood products each time they are used, between each patient. Additionally, to avoid transmissions of bloodborne pathogens, only use auto-disabling, single-use lancing devices. Please see references at the end of this section for further information.
Frequency: Always clean after each use. Always clean and disinfect before storing and between each patient test. Please read the disinfectant manufacturer’s product label.
Recommended Disinfectant: Super Sani-Cloth® wipes or any disinfectant with the same EPA Reg. No. (EPA Reg. No. 9480-4, Professional Disposables International, Inc. (PDI), Orangeburg, NY), concentration of active ingredients (0.25%) and with a contact time of 2 minutes. The active ingredients in this disinfectant are n-Alkyl dimethyl ethylbenzyl ammonium chlorides. Super Sani-Cloth was tested and found to be effective per recommended guidelines when used with this system. Please only use this disinfectant. Use of other disinfectants may cause damage to your analyzer. Do not use bleach, peroxide, or window cleaners on this analyzer. The entire case surface should be cleaned and disinfected.
Cleaning Instructions
Cleaning removes visible soil, organic material, and most importantly, blood products. Always clean before disinfecting.
- Go to SeeFigure50 Features of CardioChek PA Test System.Clean and disinfect all surfaces of this analyzer.
- Obtain recommended wipes.
- Using a fresh wipe, wring out excess liquid and carefully wipe to clean.
- Allow to air dry or dry with cotton gauze.
Disinfection Instructions
After cleaning, the next step is to disinfect. Always both clean and disinfect
- Using a fresh wipe, wring the wipe to remove excess liquid and wipe all areas thoroughly.
- Keep area wet for 2 minutes to ensure disinfectant remains in contact for aenough time to kill all bloodborne pathogens.
- Allow to air dry completely.
Note: It is important that the analyzer be thoroughly dry before using.
- The optical glass should be carefully wiped clean with an alcohol wipe and dried with gauze to remove any residue from the disinfectant.
- Inspect the glass and ensure it is clean when held at different angles. If it is not, repeat Step 4.
Following cleaning and disinfection, inspect the analyzer for the following signs of deterioration. These include:
- Scratches on optical glass
- Etching on optical glass
- Liquid under optical glass – liquid intrusion, or
- condensation
- Loss of adhesion on optical glass
- Liquid under display lens
- Loss of adhesion on display lens
- Deterioration of painted surfaces (polymer crazing, cracking, swelling, softening, peeling, etc.)
- Any loose parts
IMPORTANT: Keep area wet with disinfectant for two minutes. DO NOT soak, saturate, or immerse the analyzer or allow liquid to collect on any surface. Always make sure the analyzer is dry before use.
After disinfection, user’s gloves should be removed, and hands should be thoroughly washed with soap and water before proceeding to the next patient.
The CardioChek PA analyzer has been validated for 11,001 cleaning and disinfection cycles. Please obtain a new analyzer after cleaning and disinfecting the analyzer 11,001 times or once the lifetime of the analyzer (3 years) has been reached, whichever comes first.
Stop using the analyzer and contact Customer Service for a replacement analyzer immediately if you notice any signs of deterioration.
References
- “FDA Public Health Notification: Use of Fingerstick Devices on More than One Person Poses Risk for Transmitting Bloodborne Pathogens: Initial Communication” (2010).
http://www.fda.gov/MedicalDevices/Safety/AlertsandNotices/ucm224025.htm.
- “CDC Clinical Reminder: Use of Fingerstick Devices on More than One Person Poses Risk for Transmitting Bloodborne Pathogens” (2010). http://www.cdc.gov/injectionsafety/Fingerstick-DevicesBGM.html.
- Biosafety in Microbiological and Biomedical Laboratories (BMBL) found at http://www.cdc.gov/biosafety/publications/bmbl5/. “Protection of Laboratory Workers From Occupationally Acquired Infections; Approved Guideline-Third Edition” Clinical and Laboratory Standards Institute (CLSI) M29-A3.
Test Result – Lipid Profiler and Creatinine Profiler
At the end of the measurement the result will be displayed on the application screen.
Follow the below steps for the test result
- Click on the Fetch Button on the application. See below Figure 57Lipid Profiler Fetch Button.

Figure 57Lipid Profiler Fetch Button
- Make sure that the result will be displayed on the application screen. at the end of the measurement. See Figure 58Lipid Profiler Result.
 Figure 58Lipid Profiler Result
Gluco-Keton Meter
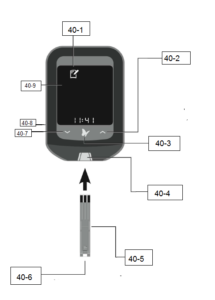
| Item no. | Parts Description | Item no. | Part Description |
| 40-1 | Logbook | 40-6 | Target Area |
| 40-2 | Up Button | 40-7 | Down Button |
| 40-3 | Power Button | 40-8 | USB Port |
| 40-4 | Strip Port | 40-9 | Display Button |
| 40-5 | Test Strip |
Testing Your Blood Glucose
- Wash and dry hands before and after testing.
Note: Check test strip expiry date.
- Insert strip. See Figure 60Strip Insert.
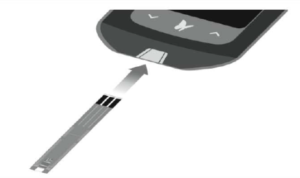 Figure 60Strip Insert
- Cut test site and apply blood. See Figure 61Blood Apply.
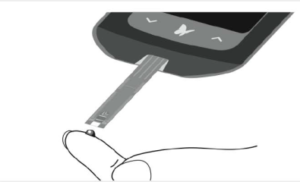
Figure 61Blood Apply
- View result. See Figure 62Result Display.
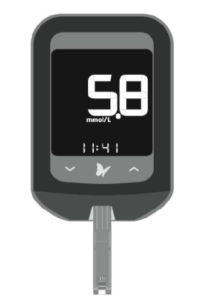
Figure 62Result Display
Important:
- Only use a test strip once.
- Read the test strip instructions for use before performing your first blood glucose or ketone test. It contains important information and will tell you how to store and handle the test strips.
- The meter and its accessories are for use by single person.
- Refer to the lancing device insert for detailed instruction on how to use the lancing device.
- Do not put urine on the test strip.
Check your ketone:
- When you have illness.
- When your blood glucose is above 13.3 mmol/L.
- When you and your healthcare professional feel it Isnecessary.
Prepare to Test
- Select your test site.
Test site choices for blood glucose testing are fingers, forearm, upper arm, or base of the thumb. Use only fingertip blood samples for blood ketone testing.
Note: Avoid moles, veins, bones, and tendons. Bruising may occur at the test site. If bruising occurs, consider selecting another site.
Do not use blood samples from alternative sites when:
- You think your blood glucose is low or changing rapidly.
- You have been diagnosed with hypoglycemic unawareness
- Alternative site results do not match the way you feel.
- You are within two hours of eating a meal, taking insulin, or exercising.
- Wash your hands and the test sites with soap and water.
- Rinse and dry thoroughly.
- Do not use lotion or cream on the test site.
- Check test strip expiry date.
- Do not use expired test strips; they may cause inaccurate results.
Blood Glucose
- Open the foil test strip packet at the notch and tear down to remove the test strip. See Figure 63Packet Open
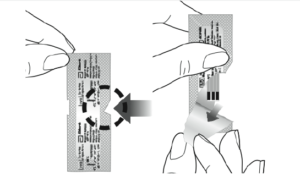
Figure 63Packet Open
- Insert the test strip into the meter until it stops.This will turn on the meter. See Figure 64Strip Insert.
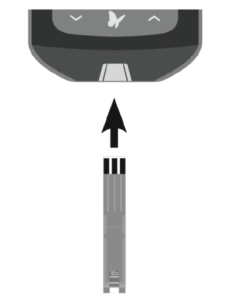 Figure 64Strip Insert
Notes:
- Be sure to check that your meter screen is working properly each time you turn your meter on. If you see any white segments in the black off screen, or any black segment in the black off screen, or any black segments in the white test screen, there may be a problem with the meter.
The meter turns off after 3 minutes of inactivity. Remove and reinsert the unused test strip to restart the meter.
The blinks, indicating the meter is ready for you to apply a sample to the test strip.SeeFigure 65Blink Indicator.
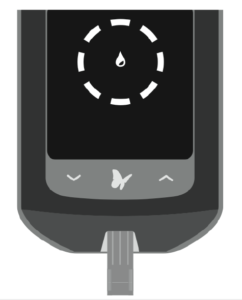
Figure 65Blink Indicator
- Obtain a blood sample.
Use the lancing device to obtain a blood sample. See Figure 66Blood Sample.

Figure 66Blood Sample
- Apply blood to the test strip.
a. Bring the blood to the white area at the end of the test strip. The blood is drawn into the test strip. See Figure 67 Blood Test at White Strip.
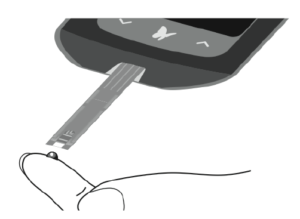
Figure 67 Blood Test at White Strip
b. Hold blood to test strip until you see 3 short lines on the meter screen. This means you have applied enough blood. See Figure 68Short Lines Indicators.
Figure 68Short Lines Indicators
- View the result.
The test is complete when the result appears on the meter screen. The result is stored in memory. See Error! Reference source not found.
Test Result – Blood Sugar (Fasting)
At the end of the measurement the result will be displayed on the application screen. Follow the below steps for the test result.
- Click on the Fetch Button on the application. See below Figure 69 Blood Sugar (Fasting) Fetch Button.
![]()
Figure 69 Blood Sugar (Fasting) Fetch Button
- Make sure that the result will be displayed on the application screen. at the end of the measurement. See Figure 70 Blood Sugar (Fasting) Result.
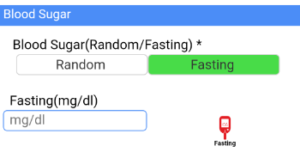
Figure 70 Blood Sugar (Fasting) Result
Test Result – Blood Sugar (Random)
At the end of the measurement the result will be displayed on the application screen. Follow the below steps for the test result
- Click on the Fetch Button on the application. See below Figure 71 Blood Sugar (Random) Fetch Button.
![]()
Figure 71 Blood Sugar (Random) Fetch Button
- Make sure that the result will be displayed on the application screen. at the end of the measurement. See Figure 72 Blood Sugar (Random) Result.
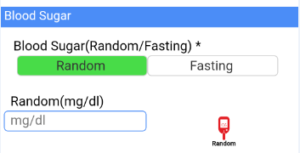 Figure 72 Blood Sugar (Random) Result
HemoglobinMeter
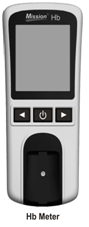
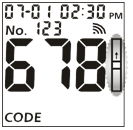
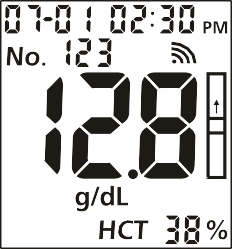
Hb Meter: Reads the test strips and displays the hemoglobin (Hb) concentration and calculated hematocrit (Hct) value.
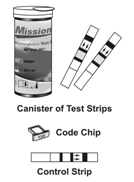
Test Strips: Part of the system and used with the meter to measure Hb concentration and calculated Hct in blood.
Code Chip: Automatically calibrates the meter with the code number when inserted into the meter.
Control Strip: Verifies the proper operation of the meter by checking that the meter can detect a pre-calibrated value.
Meter Display
During testing, the Mission®Hb Hemoglobin Meter will display icons showing the status, options available and prompts for testing:
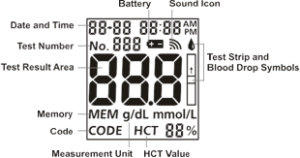
Sound Icon: Appears when the sound is turned on. Battery: Appears when the battery should be replaced. Test Number: Indicates assigned test number.
Test Result Area: Indicates test result or displays menu options. Memory: Indicates a test result is being recalled from memory. Code: Indicates the code number of the test strips.
Measurement Units: Indicates the units for the test result.
HCT Value: Shows calculated Hct value.
Test Strip and Blood Drop Symbols: Indicates when to insert test strip or apply specimen.
Test Strips
The Mission®Hb Hemoglobin Test Strips are thin plastic strips which contain a chemical reagent system which works with the Mission®Hb Hemoglobin Meter to measure the hemoglobin (Hb) concentration in capillary and venous whole blood.
Each test strips appears as shown:

![]()
Specimen Application Area – After strip is inserted into the Strip Channel, apply 10 µL of blood to the center of the test strip. The Specimen Application Area is visible from the front and the back of the Test Strip.
Insert Arrows – Located on the front of the test strip, the arrows show the direction in which the test strip should be inserted
Specimen Application
For best results, fill the Specimen Application Area with approximately 10 µL of blood specimen. Incorrect results may occur if the specimen is not applied correctly, or if the Specimen Application Area is not filled.
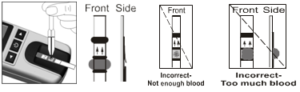
After applying the specimen, ensure the Specimen Application Area is completely covered. The Specimen Application Area should remain covered throughout the entire test. If the Specimen Application Area is not covered, or if there is too much specimen covering the Specimen Application Area, repeat the test with a new test strip.
Note: Do not add more blood to the test strip if the specimen applied to the Specimen Application Area is too little. Error E-5 or a low result may appear on the display. Discard the used strip and retest.
Strip Processing and Testing
Turn the meter on. The screen will briefly display all of the LCD symbols. Observe the LCD at startup to ensure all segments and display elements are turned on, and there are no missing icons or elements. The meter will briefly show a blank display. Observe there are no segments or icons permanently turned on.
After startup, the Initial Screen will be displayed. Ensure the code chip is inserted, and compare the number showed in the display with the code number printed on the test strip canister label
The strip symbol will flash when the meter is ready for the strip to be inserted.
Testing
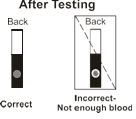
Insert a test strip into the strip channel in the same direction as the arrows indicated on the strip. Ensure that the test strip is inserted all the way to the end of the strip channel, until the white edge of the test strip above the black line is no longer visible.
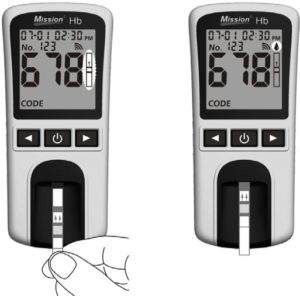
The blood drop symbol will flash when the meter is ready for the specimen to be applied. Apply approximately 10 µL of blood to the middle of the Specimen Application Area of the test strip.
Note: For testing capillary blood, use the second drop of blood for accurate results. Refer to Section 6 Fingertip Testing for details.
The meter will begin testing automatically with three dashes in a line flashing on the display indicating the test is in progress.
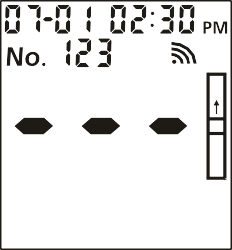
Hb results will be displayed within 15 seconds, with Hctvalue displayed at the bottom of the screen.
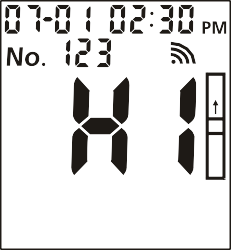
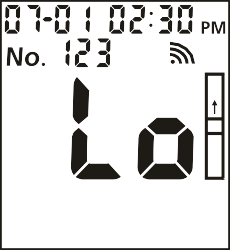
If the concentration of hemoglobin is less than 5 g/dL (50 g/L or 3.1 mmol/L), the meter will display Lo. The meter will display Hi if the concentration is more than 25.6 g/dL (256 g/L or 15.9 mmol/L).
Remove the used test strip. The meter will return to the initial screen ready for another strip to be inserted and a test to be performed.
Note: Discard all blood specimens, used test strips and materials carefully. Treat all blood specimens as if they were infectious materials. Follow proper precautions and obey all local regulations when discarding blood specimens and materials.
Maintenance
Proper maintenance is recommended for best results.
For best results, the meter should be cleaned after each day of testing.
Meter Surface
A cotton cloth can be used to clean the surface of the meter. Use a damp cotton cloth if necessary.
A dry, soft cloth may be used to clean the LCD and the sensor area. It is recommended that the meter be stored in the carrying case after each use.
Take care to avoid getting liquids, residue, or control solutions in the meter through the Strip Channel, Code Chip Slot or USB Port.
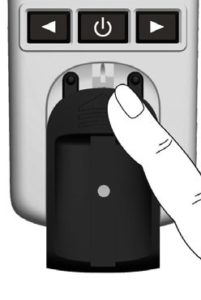
Test Strip Holder
Remove the Test Strip Holder by pressing in on middle of the Test Strip Holder and sliding it out from the meter. Wipe it with a damp cloth or a mild detergent and dry it with a dry, soft cloth. Slide the Test Strip Holder back into the meter by laying it flat on the meter. Firmly press down on the center of the Test Strip Holder with your thumb and push it in until it clicks into place.
Note: Do not use organic solvents, such as gasoline or paint thinner.
This will cause damage to the meter.
Meter Sensor Area
Remove the Test Strip Holder as described in the previous section. Wipe down the Meter Sensor Area with a cotton swab. Do not to scratch the transparent window covering the sensor.
Note: Do not use bleach or alcohol to clean the Meter Sensor Area.
This will cause damage to the meter.
Troubleshooting
| Display | Causes | Solution |
| E-1
|
The sensor area is damaged, dirty, or blocked at turn-on, such as a used test strip left in the meter. |
Ensure the sensor area is clean and that there are no objects covering the sensor area. Refer to Section 10 Cleaning. Restart the meter. Contact your local distributor if the sensor area window is broken. |
| E-2 | Test strip was removed during the test. | Repeat the test and ensure the test strip remains in place. |
| E-3 | Specimen was applied to the test strip too soon. | Repeat the test and apply specimen after blood drop symbol appears. |
| Batteries are discharged but have enough power to run 20 more tests. | Test results will still be accurate but replace the batteries as soon as possible. | |
| E-4 | Batteries have discharged and meter will not allow more tests until discharged batteries are
replaced. |
Replace the batteries, or connect the meter to the AC Adapter, then repeat the test. |
| E-5 | Insufficient specimen. | Repeat test and apply enough specimen. Use around 10 μL of whole blood. |
| E-6 | Expired test strip. | Ensure the test strips are within the expiration date printed on the canister label. |
| E-7 | Code chip was removed during testing. | Insert proper code chip. Confirm the
code chip matches the test strip code and repeat the test. |
| LO | The test result is lower than 4.5 g/dL (45 g/L or 2.8 mmol/L). | If the specimen was taken from a specimen container, ensure the specimen is mixed well and repeat test. |
| Insufficient specimen less than 1μL | Repeat test and apply enough specimen. Use around 10 μL of whole blood. | |
| HI | The test result is higher than 25.6 g/dL (256 g/L or 15.9
mmol/L). |
If the specimen was taken from a specimen container, ensure the specimen
is mixed well and repeat test. |
|
No code chip in the meter; Code chip is damaged or inserted incorrectly. |
Insert the code chip that accompanied the box of test strips.
If the code chip is damaged, use a new code chip with the correct code number. If the code chip is inserted incorrectly, remove the code chip and insert it into the code chip slot. |
Test Result – Hemoglobin
At the end of the measurement the result should be manually enter in the application screen. See Figure 73 Hemoglobin Result.

How to take Print Out
VitalZ-X printer is connected to tablet through Bluetooth.
Follow the below steps to take print
- Click Savein the bottom-right corner after fetching the diagnosis data.
Note: click reset in the bottom-leftcornerto clear the data on the patient diagnosis screen.
- Click I Agreein the bottom-left corner.
Note: click cancelbottom-right cornerto redirect to the diagnosis screen.

- Click Printin the bottom-left corner.
Contact information
Email us at info@charttechnosolutions.com
Call the Contact number 040-35911530